Documentation
Mi Tailoring WordPress Basic Pugin V1
Thank you so much for purchasing our item from Mi Tailoring.
Mi Tailoring Basic WordPress Plugin is developed for the tailoring businesses that run online. It's providing unique and user extracting solutions for tailoring businesses. With any simple eCommerce website that can be easily integrated and allows the customers more facilities to enjoy the ordering process.
Check our Online Demo- Version: 1.0
- Author: Mi tailoring
- Dependency: WooCommerce Plugin
- Created: 1 June, 2021
- Update: 20 December, 2021
Technical Specifications
- Programming: PHP v7.2+
- WordPress Version Support: v4.8+
- WooCommerce Version Support: v4+
- Structure Followed: OOP & Procedural Mix
-
JavaScript Libraries:
- JQuery v3+
- Font Awesome v5+
- Data Table
- Toast Notification
- Sweet Alert
- Html & Css Library: Bootstrap
If you have any questions that are beyond the scope of this help file, Please feel free to email via Item Support Page.
Installation
Follow the steps below to install & setup your plugin:
-
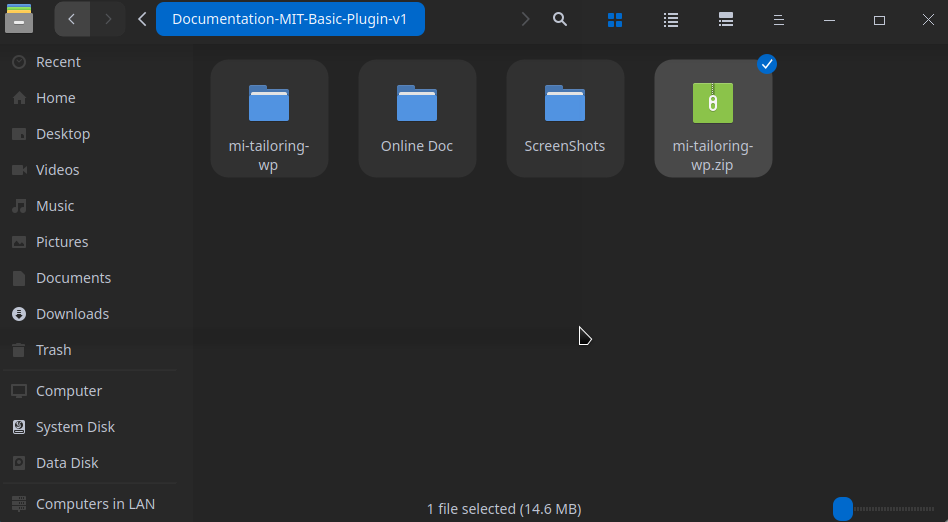
Download the file from your order page, called Mi-Tailoring-WP-Basic-Plugin-V1.zip. Now extract the zip file and there will be another zip file called mi-tailoring-wp-basic-plugin-v1.zip
-
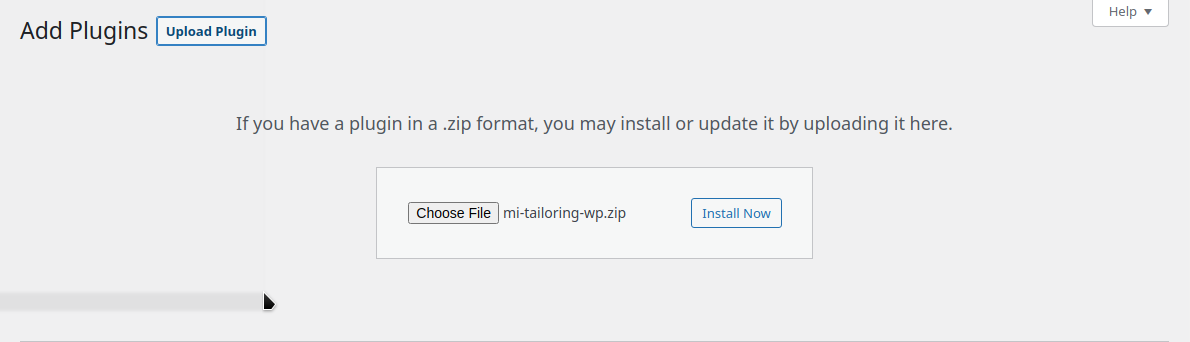
Now upload this zip to your wordpress website and activate it.

-
Now the the plugin has been activated, Now there's a menu on wordpress admin sidebar called Mi Tailoring.
Note: The plugin will not be activated without WordPress WooCommerce Plugin. This plugin is working with the dependency of WP WooCommerce.

-
Now click on the plugin and it will move to the Mi Tailoring Control Panel.
- If the plugin control panel appeares, You have installed the Mi Tailoring Plugin Successfully!
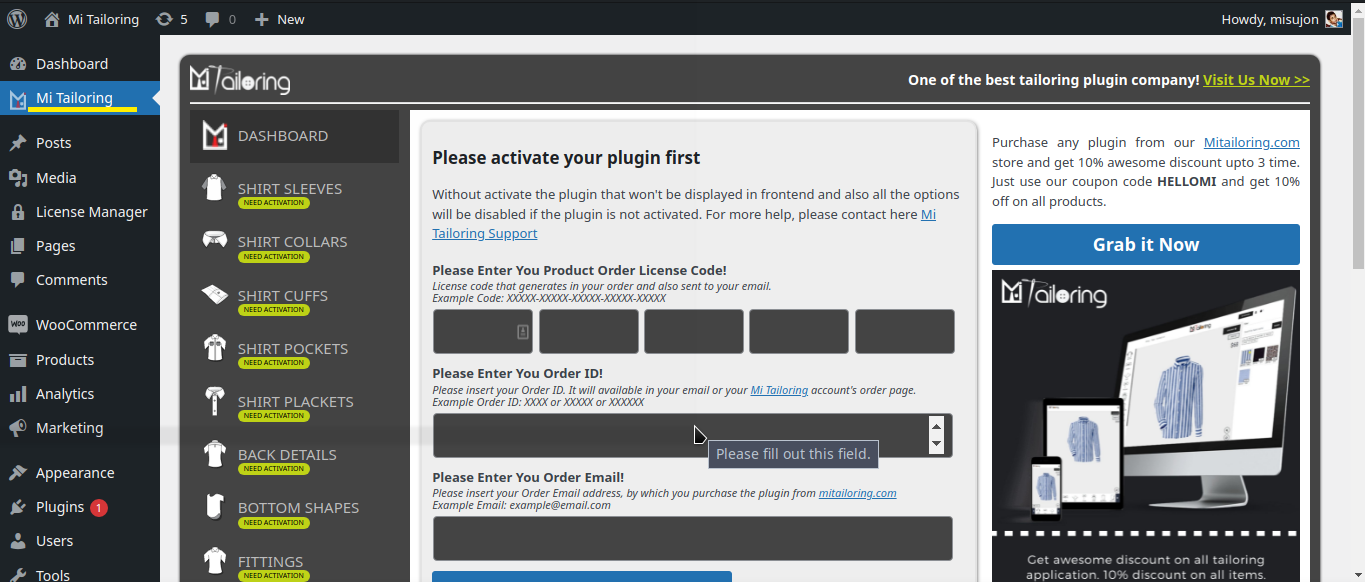
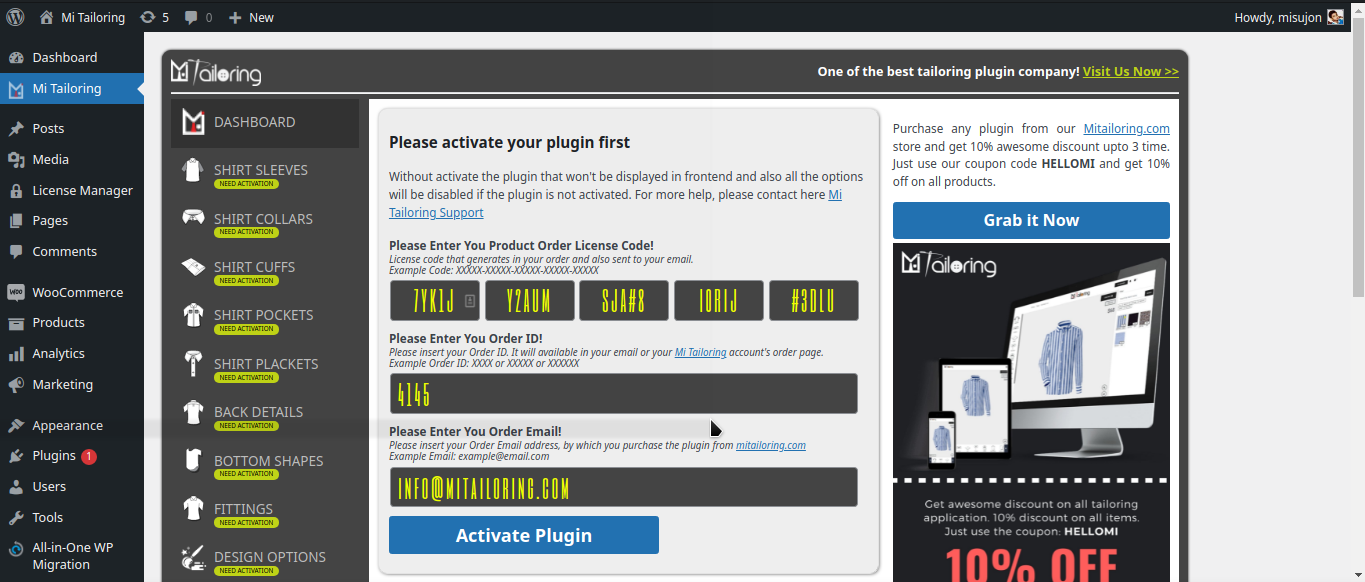
Activation
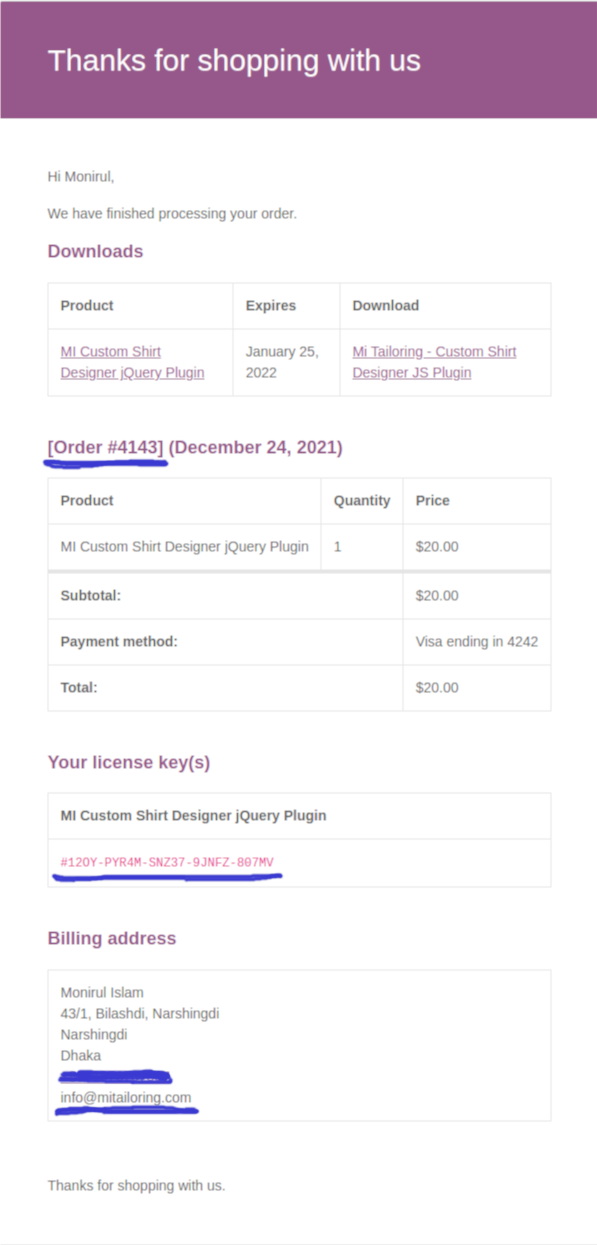
To activate the plugin there's required some credentials that available your order details in Mi Tailoring Account Page or you can get it from your email too.
Details Required:
-
Plugin License Code.
Must be 25 character code. Example: XXXXX-XXXXX-XXXXX-XXXXX -
Your Order Email Address.
Example: [email protected] -
Your Order ID.
Example: XXXXX or XXXXXX or XXXX
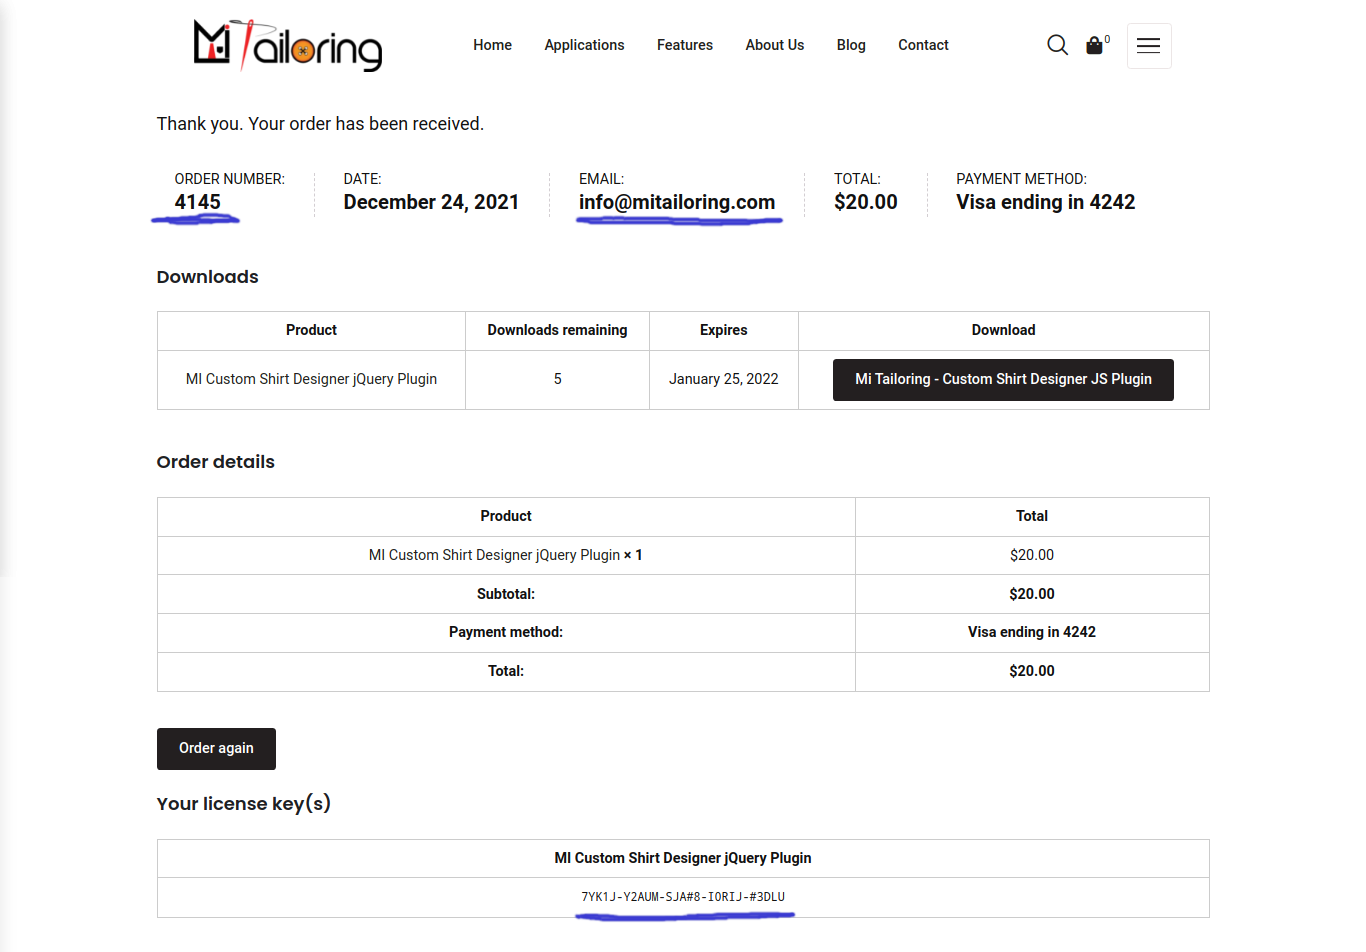
Now You have to use those information to your website plugin dashboard. Like below
When the application will validate the information it will show a success message and reload the page automatically.
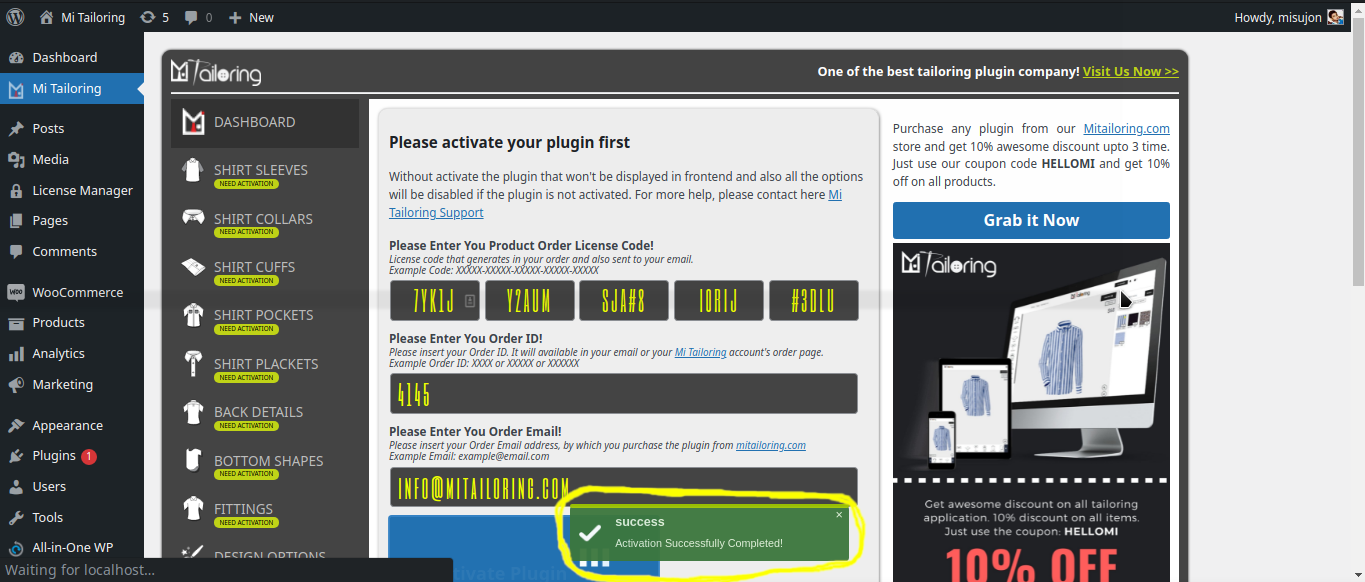
Now everything is accessible to your panel, All the activation message will be gone.
For More Instruction Please Watch Here.
If you need more information, please visit Mi Tailoring site: https://mitailoring.com/contact/
Setup Plugin
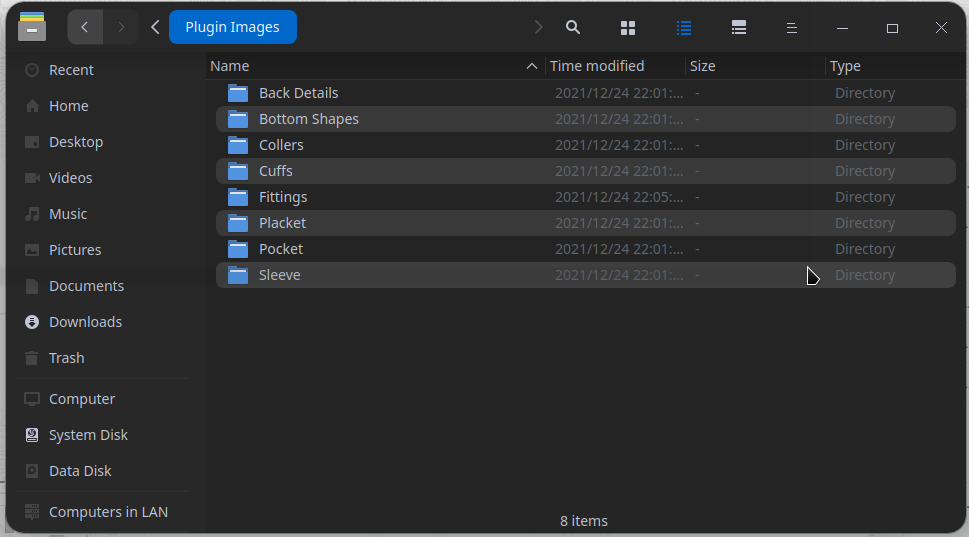
Documentation and examples for setting up plugin sections and upload the images to different section. One directory called Plugin Images will be in the extracted folder. Now from there, you need to get the images and upload them to the plugin different section.
Here is the plugin setup tutorial, you can check it or you can also read our rest of the documentations, where everything has been described clearly with screenshots.
Sleeves Setup
On this screen there will be a Add New button after the title Sleeves. Just click on it and a form will popout with the required fields.
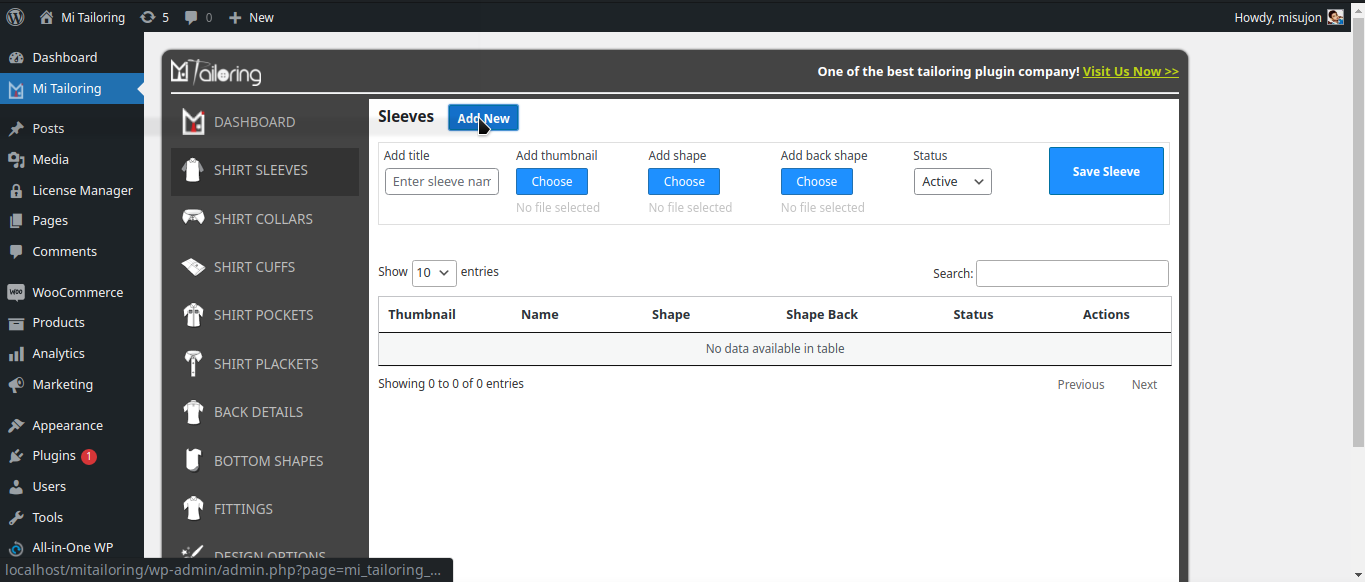
- Sleeve Title
- Sleeve Thumbnail
- Sleeve Shape
- Sleeve Back Shape
- Status
Those all the images will be available to the Plugin Images Folder. The path will be
Plugin Folder > Plugin Images > Sleeve > {Images for sleeve section}
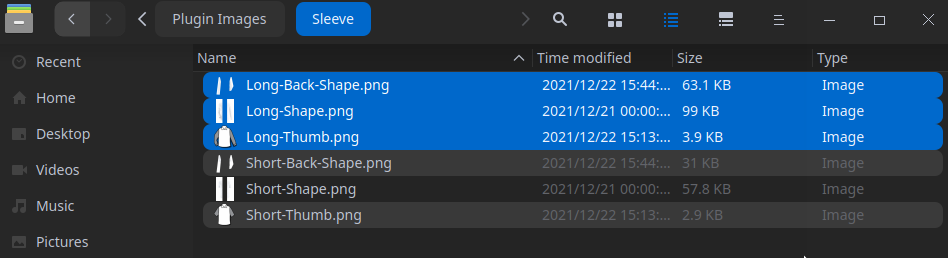
So, those images need to be added to the sleeve adding form below and save them.

Collars Setup
On this screen there will be a Add New button after the title Collars. Just click on it and a form will popout with the required fields.
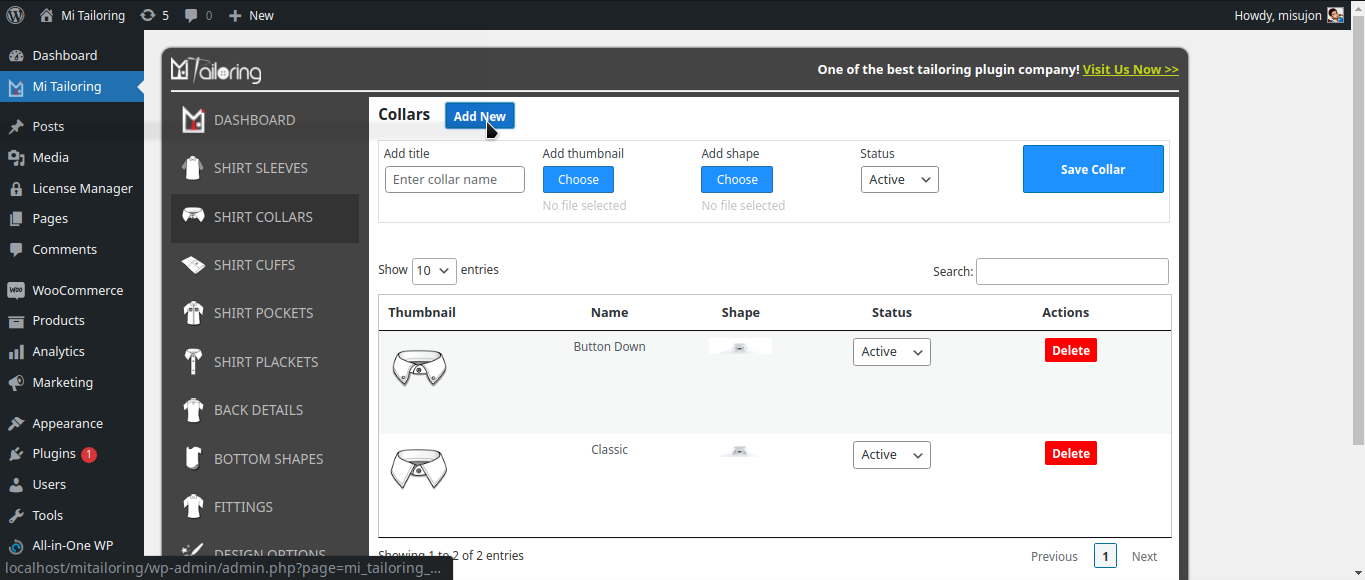
- Collar Title
- Collar Thumbnail
- Collar Shape
- Status
Those all the images will be available to the Plugin Images Folder. The path will be
Plugin Folder > Plugin Images > Collars > {Images for collar section}

So, those images need to be added to the collar adding form below and save them.

Cuffs Setup
On this screen there will be a Add New button after the title Cuffs. Just click on it and a form will popout with the required fields.
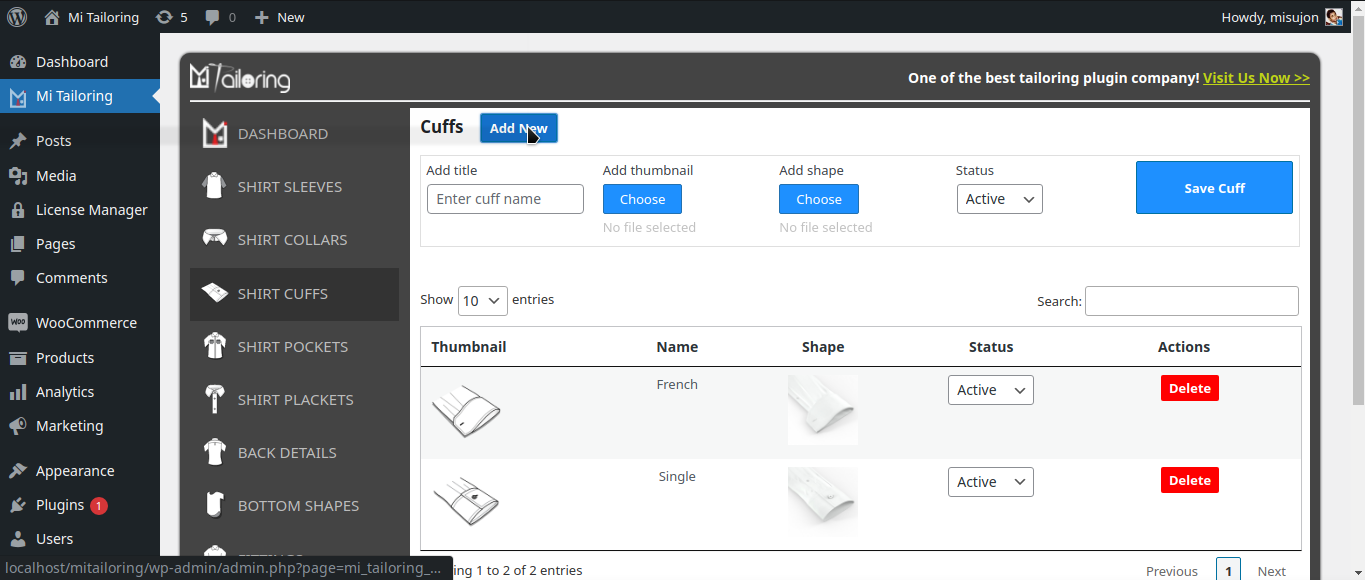
- Cuff Title
- Cuff Thumbnail
- Cuff Shape
- Status
Those all the images will be available to the Plugin Images Folder. The path will be
Plugin Folder > Plugin Images > Cuffs > {Images for cuff section}

So, those images need to be added to the cuff adding form below and save them.

Pockets Setup
On this screen there will be a Add New button after the title Pockets. Just click on it and a form will popout with the required fields.
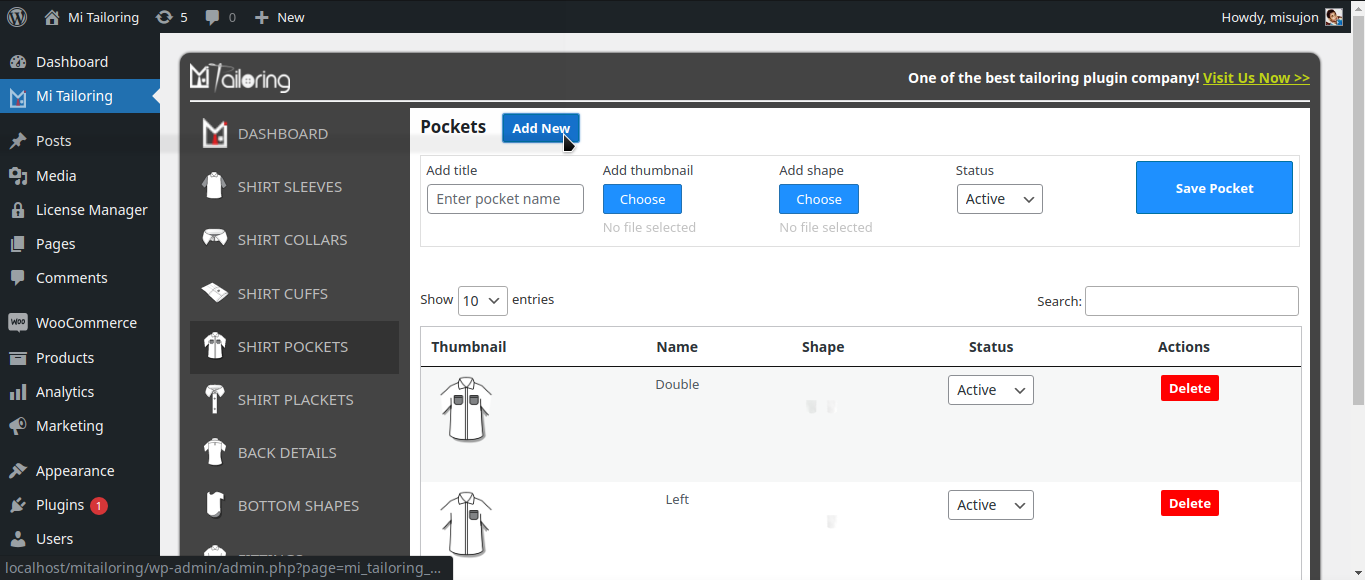
- Pocket Title
- Pocket Thumbnail
- Pocket Shape
- Status
Those all the images will be available to the Plugin Images Folder. The path will be
Plugin Folder > Plugin Images > Pocket > {Images for pocket section}

So, those images need to be added to the pocket adding form below and save them.

Placket Setup
On this screen there will be a Add New button after the title Placket. Just click on it and a form will popout with the required fields.
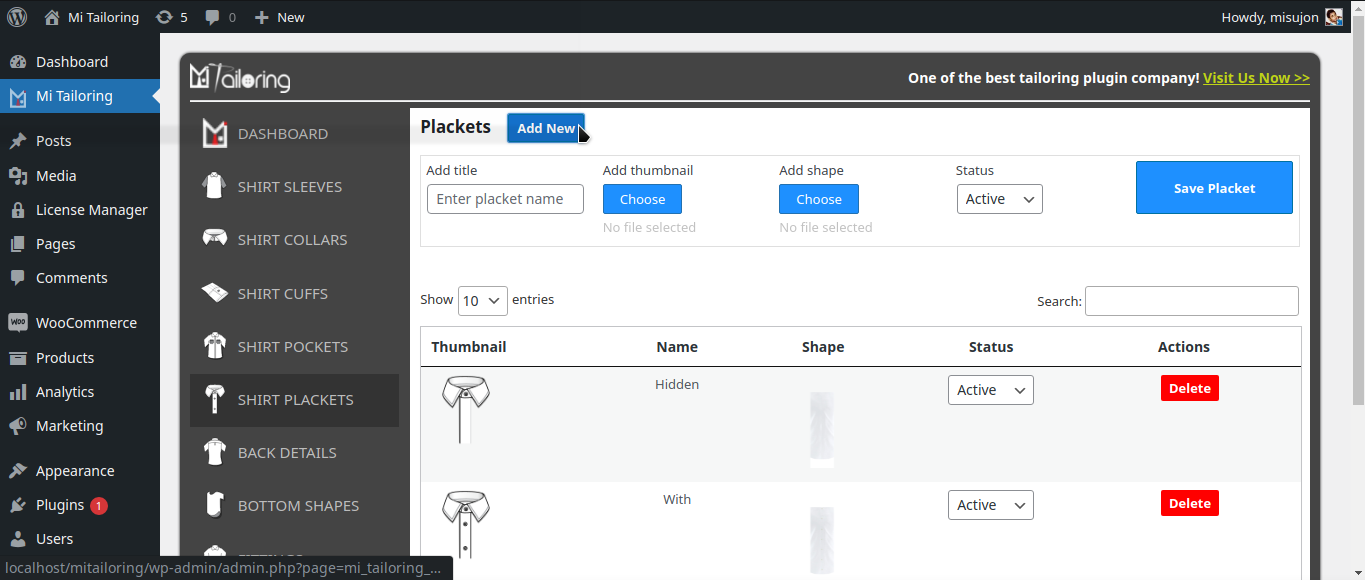
- Placket Title
- Placket Thumbnail
- Placket Shape
- Status
Those all the images will be available to the Plugin Images Folder. The path will be
Plugin Folder > Plugin Images > Placket > {Images for placket section}

So, those images need to be added to the placket adding form below and save them.

Backs Setup
On this screen there will be a Add New button after the title Backs. Just click on it and a form will popout with the required fields.
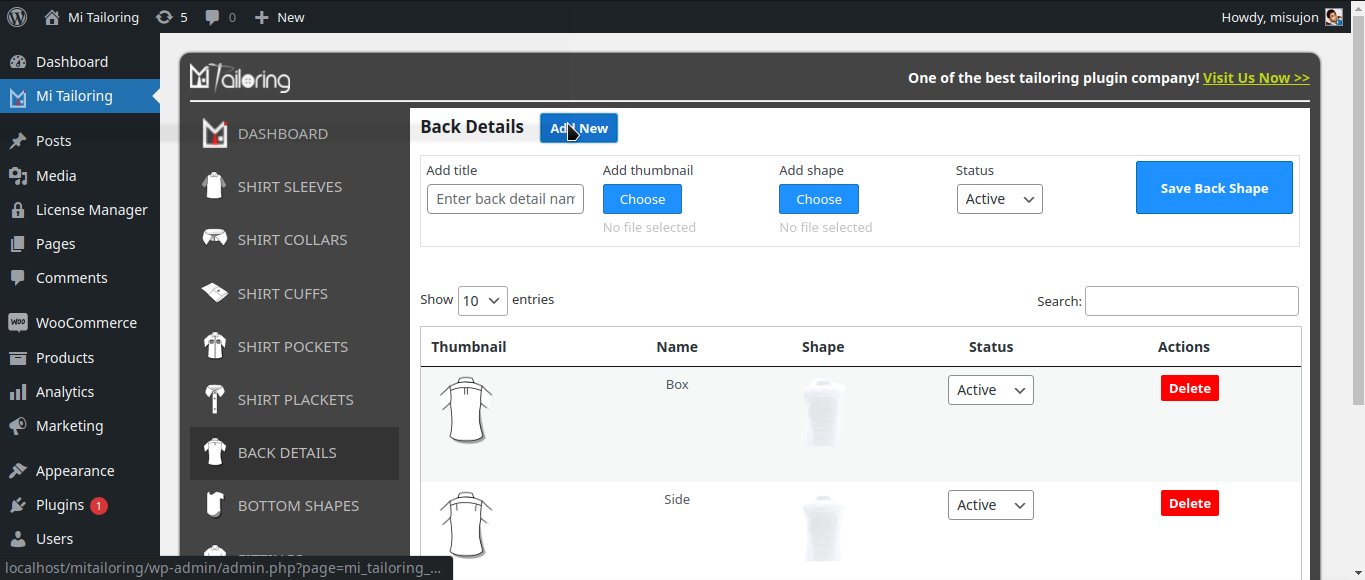
- Back Title
- Back Thumbnail
- Back Shape
- Status
Those all the images will be available to the Plugin Images Folder. The path will be
Plugin Folder > Plugin Images > Back Details > {Images for back details section}

So, those images need to be added to the back adding form below and save them.

Bottom Setup
On this screen there will be a Add New button after the title Bottoms. Just click on it and a form will popout with the required fields.
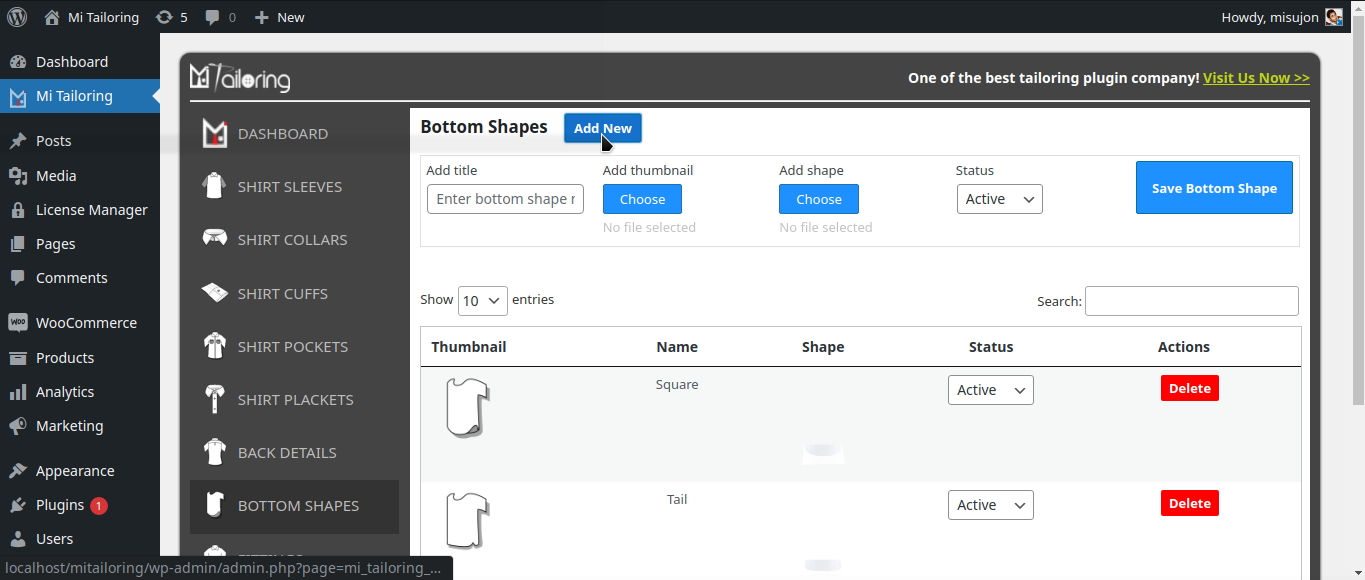
- Bottom Title
- Bottom Thumbnail
- Bottom Shape
- Status
Those all the images will be available to the Plugin Images Folder. The path will be
Plugin Folder > Plugin Images > Bottom Shapes > {Images for bottom section}
So, those images need to be added to the bottom adding form below and save them.

Fittings Setup
On this screen there will be a Add New button after the title Fittings. Just click on it and a form will popout with the required fields.

- Fitting Title
- Fitting Thumbnail
- Fitting Shape
- Status
Those all the images will be available to the Plugin Images Folder. The path will be
Plugin Folder > Plugin Images > Fittings > {Images for fitting section}

So, those images need to be added to the fitting adding form below and save them.

Design Options Setup
On this screen there will be some existing options. Those options are static, You can only update them with their name and icons. If any will be deleted from there, the plugin won't visible that to the customer end.
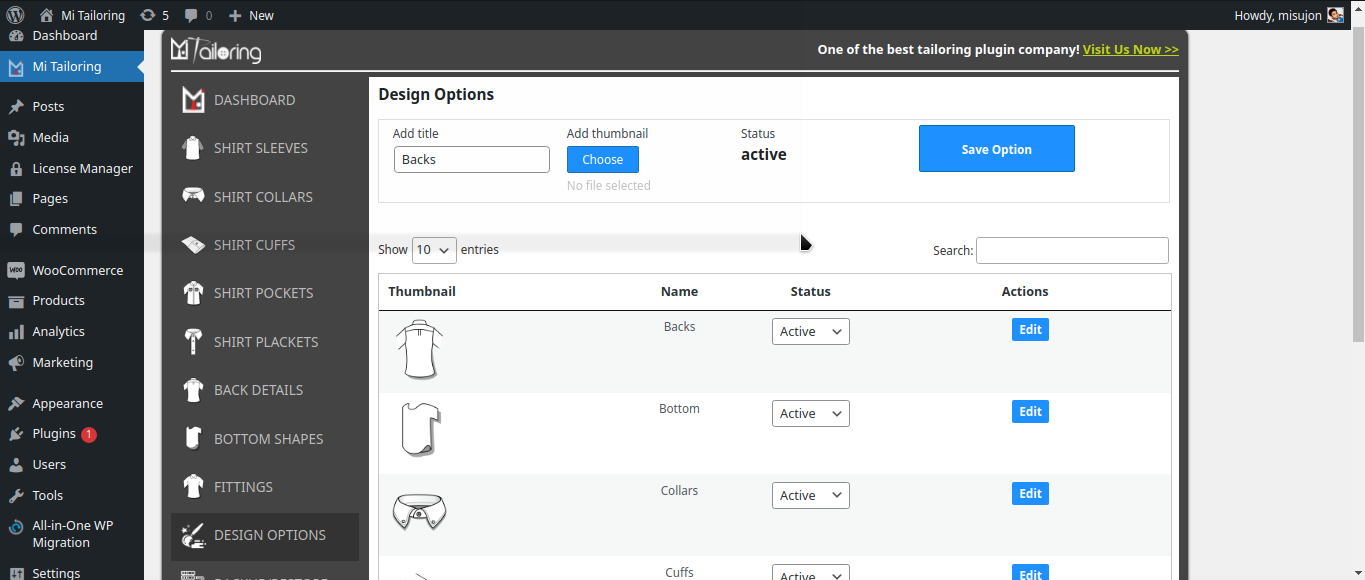
- Title
- Thumbnail
- Status
Those all the images will be related to the existing images of the other options. You can easily pick any image for an option and update it there. And that will be visible on the left sidebar of client end of the plugin.
So, those images need to be updated to visible on the clientend. Here on this video, demonstrates how to setup the Mi Tailoring WordPress Basic plugin on your website and make it workable. There are different sections in that plugin which need to be controlled are,
- Design Options Section
- Backup & Restore
- Settings Section
-
Client End Plugin Working Process
- How to choose fabric
- How to choose designs
- How to choose fittings
- How to set measurements
- How to review and add to cart item
- How to complete Orders
For More details please check bellow video where the design option and rest other all settings and order processing is demonstrated.
Backup Restore
On this sectiong there's a text field where showing some encryped text. Just copy this code after completing the other total setup process. Now keep this code in text file which will be safe in your side.

Whenever there were any issue in your wordpress or hacked or data lose accidently, than you just need to pest that code to this text field and save it, After that the total application data will be restored perfectly.
Note: Please don't change anything on this code, that can break your plugin structure and functionality. This is only for backup and restore functionality purpose.
Settings Section
This section is an important part of the plugin. By this section you will be able to control your plugin. There are couple of options here which will perform the action by their values you set.

-
Plugin title:
This option will control your plugin title area. Whatever text you will add here and that will be visible to the frontend of your plugin.

-
Plugin title show:
This option will control your plugin title visibility. If you set it as yes the title area will be shown in frontend and if not than the area will not be visible.
-
Plugin border show:
This option will control your plugin border area. If you set it as yes the border of plugin area will be shown in frontend and if not than the border will not be visible.
-
Plugin border color:
This option will control your plugin border color. This function dependent on the Plugin border show option. If the border show is Yes than the border color will be shown from this option. You can set any color code here.

-
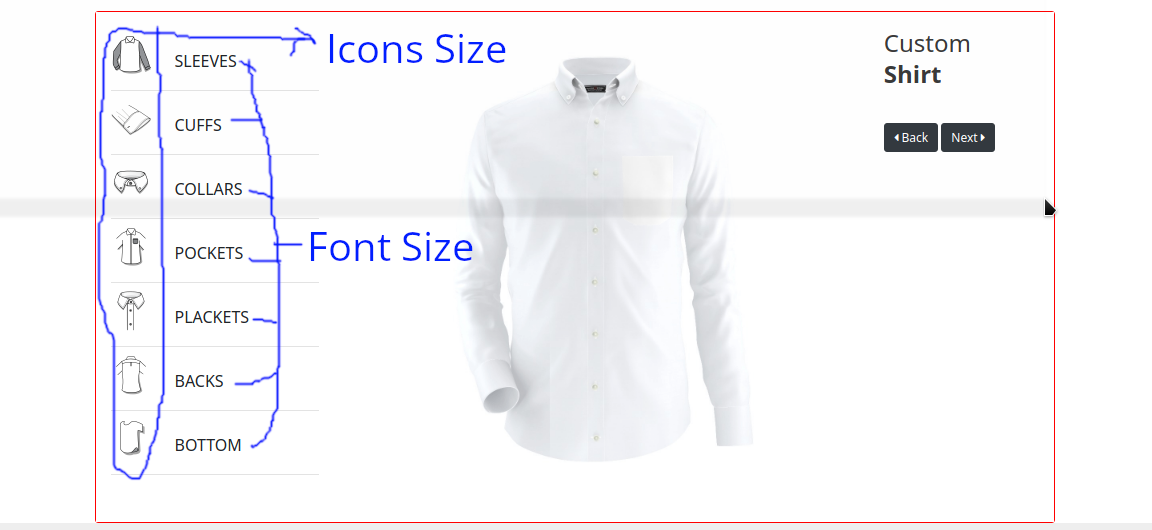
Designer menu icon size & Designer menu font size:
Those two optioon controls the plugin sidebar icons and text. The plugin's icon sizes will be set in pixel and the font sizes too.

-
Product show & Product show quantity per page:
Those two optioon controls the products to show in the plugin client end. Whenever a client will visit the plugin page they will show some products first to choose one, those products will be controlled from product show. This option takes onecategory slug
or all keyword. By this keyword the plugin filters the products and showing to the frontend.

And about the Product show qty per page will control the amount of product showing in a page. That means if you set 10 the 10 items will be shown in the client end of the plugin.
-
Plugin background Type & Background:
Those two optioon controls the plugin's background property. If the background type selected as color the backfround field will take color code or color name.

Otherwise if the type selected as image the field will take an image url and that appeares in the plugin background
-
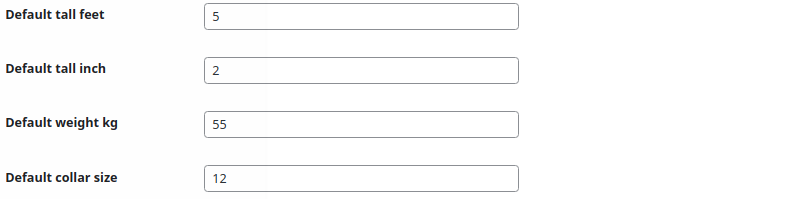
Plugin Measurement Controls:
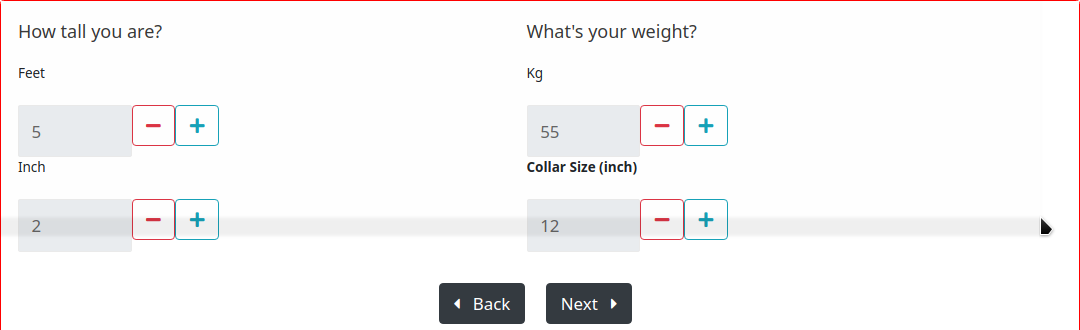
Those options are defining the plugin's default measurement showing on the frontend. If you set them on the admin panel of the plugin those will be showing in the front side by default, and with that if client's wants to change the measurement they can do it easily by preccing (+) and (-) buttons.
-
Add to cart button text :
This option enebles you to change the add to cart button text. Which will appear after the a customer selected all the items from your plugin.

How to Order by Mi Tailoring Plugin
Couple of steps are here to order through Mi Tailoring plugin.
-
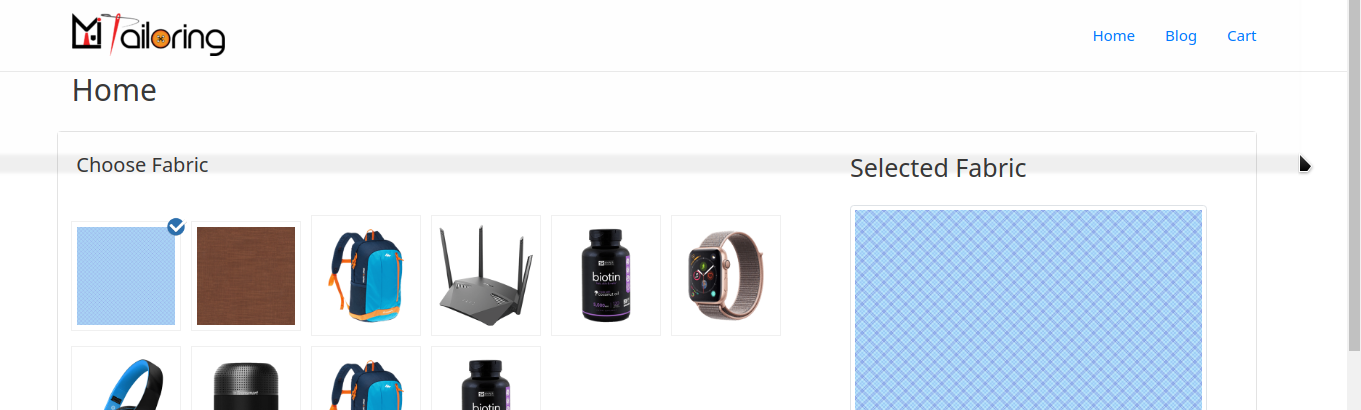
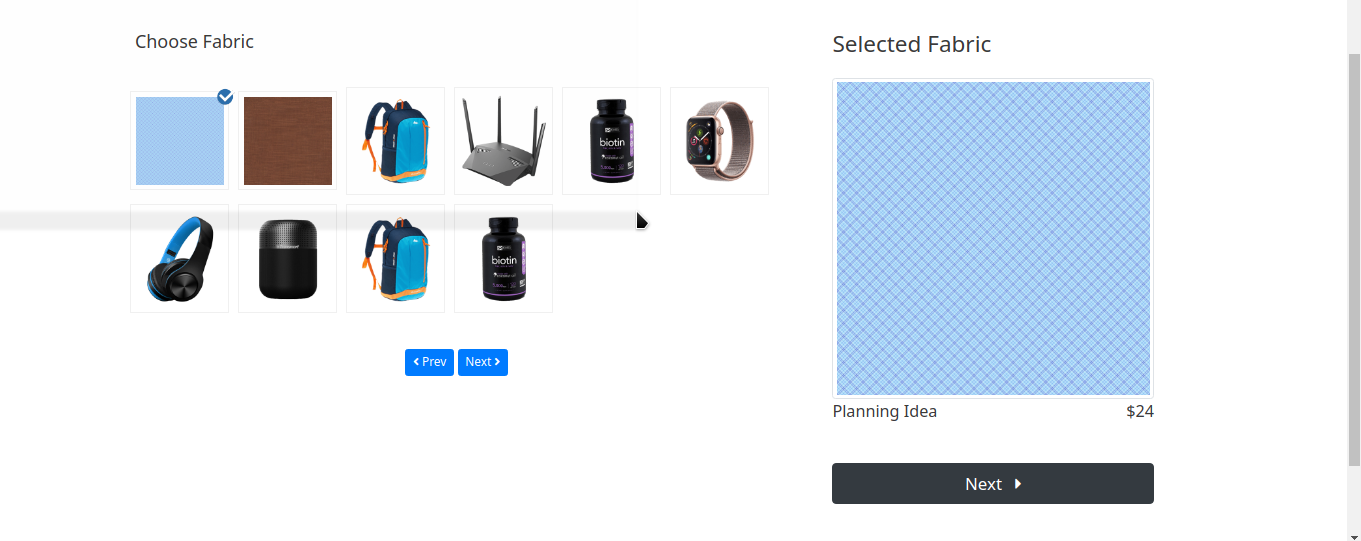
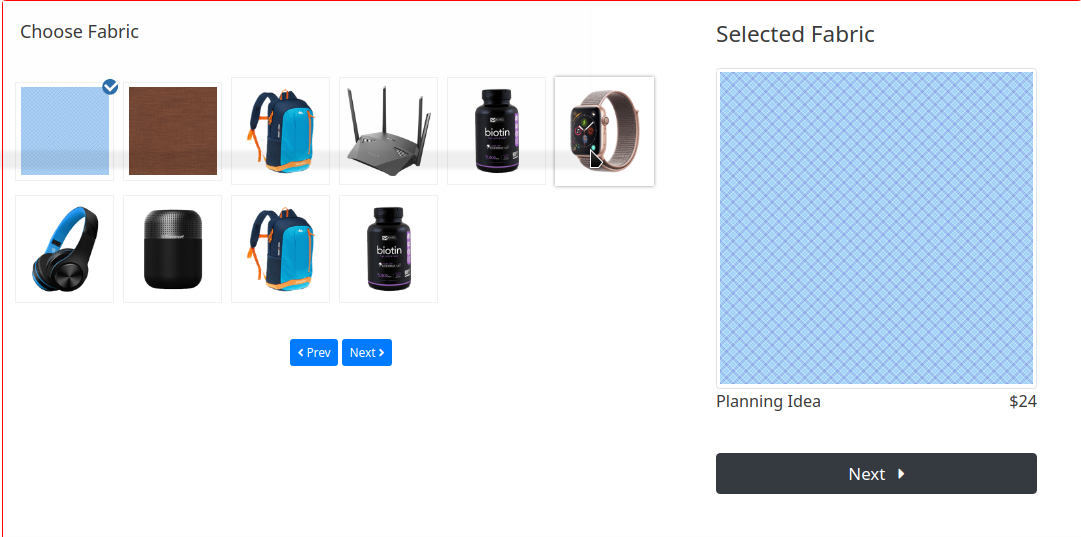
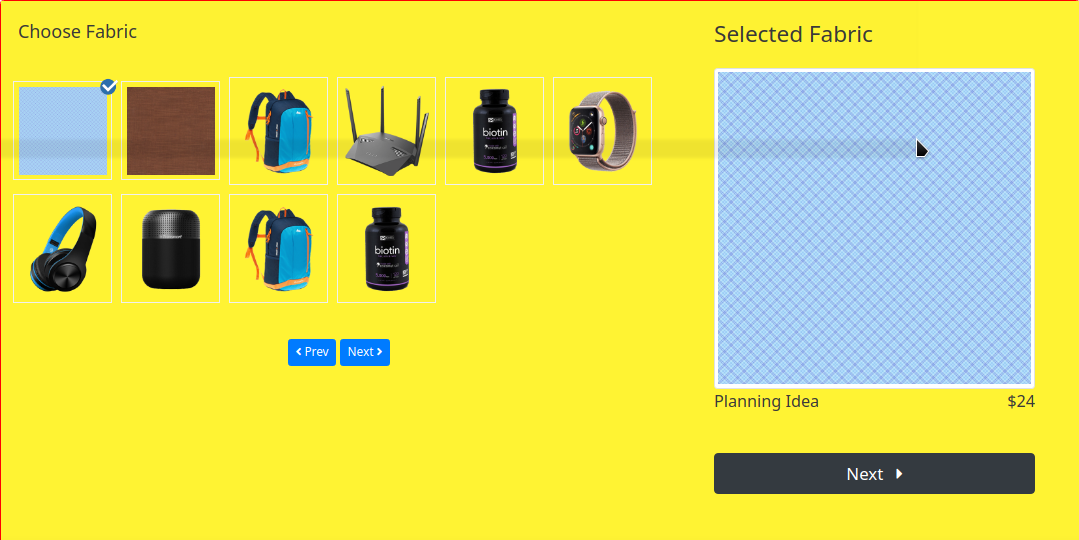
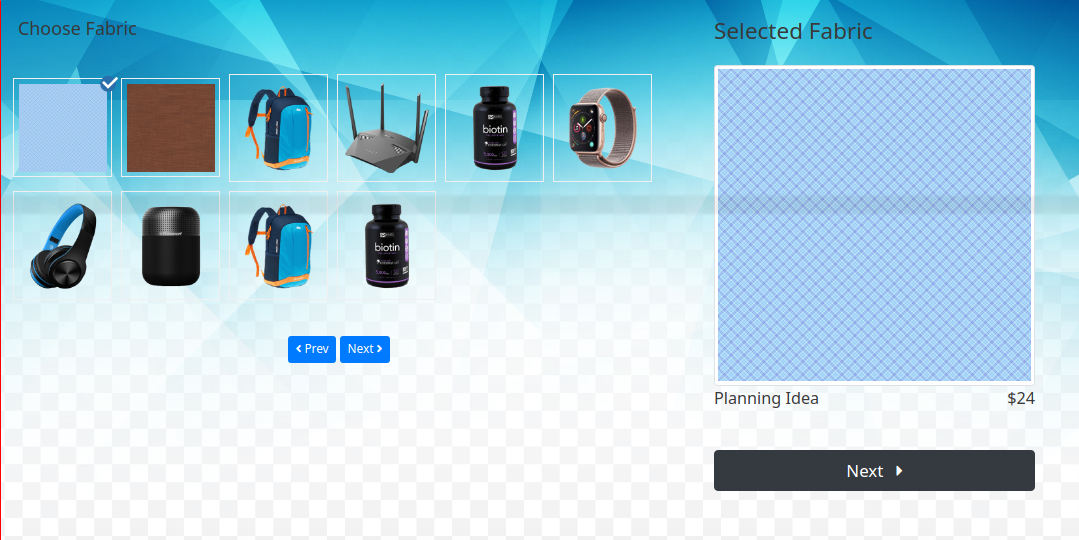
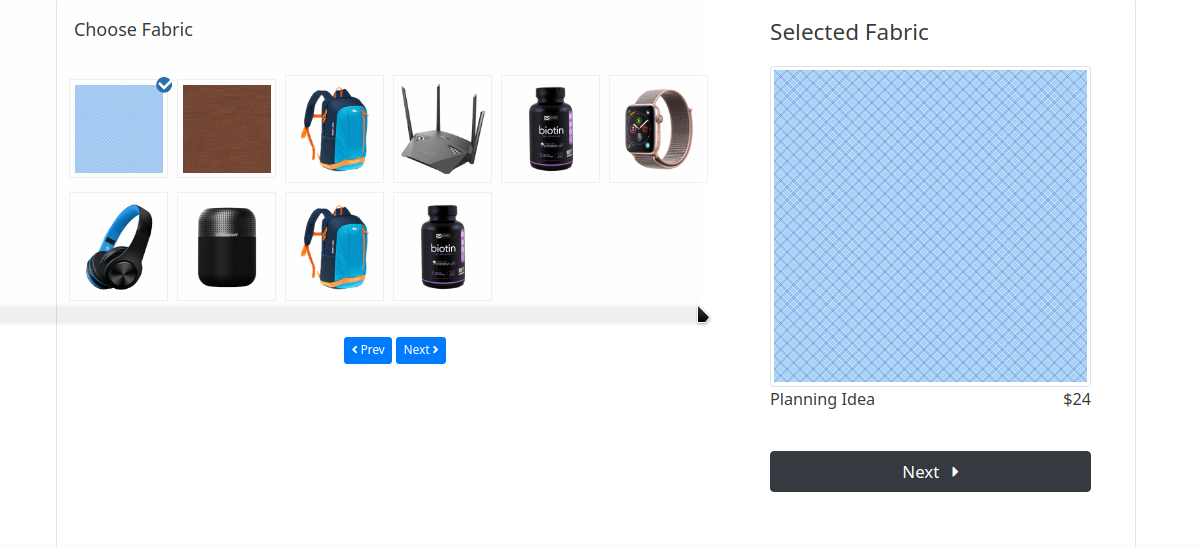
Choose Fabrics
When a custom will go to the plugin page they will get an interface where the products will be showing comes from WooCommerce. By default the first item will be selected and if a customer want another product, just need to select that item. A short description with the image will be visible right side of the panel. After selecting the fabric just simply click next and the customer will get the actual designer section.
-
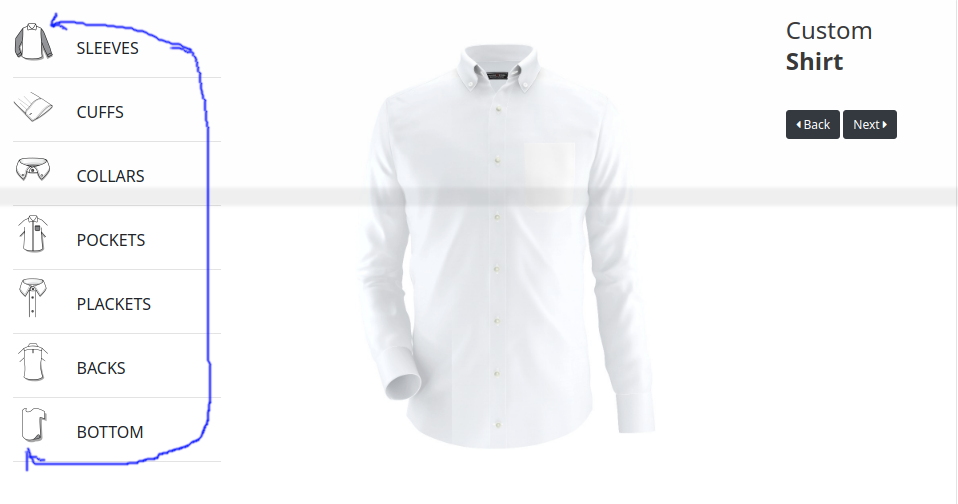
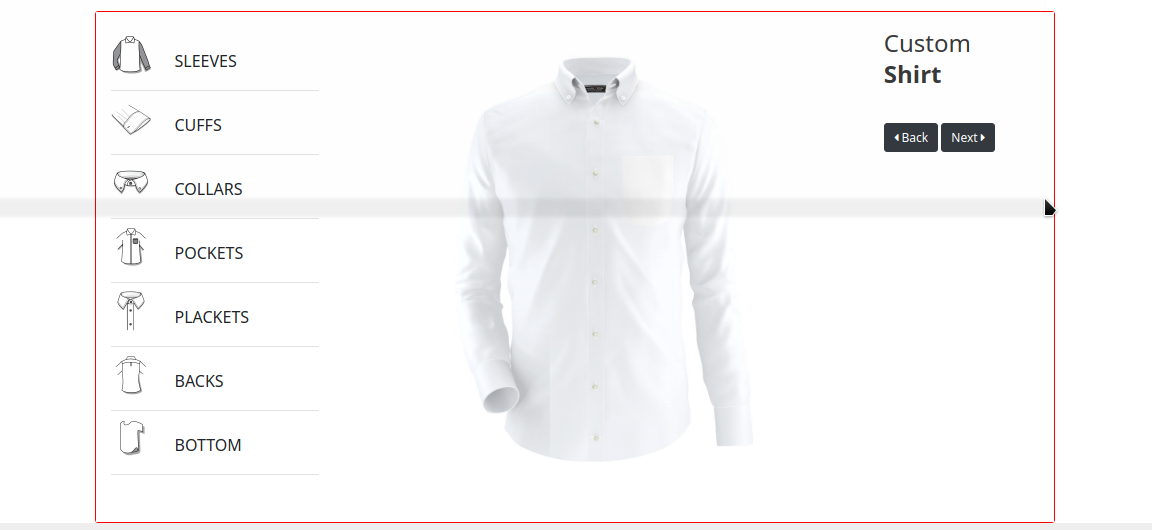
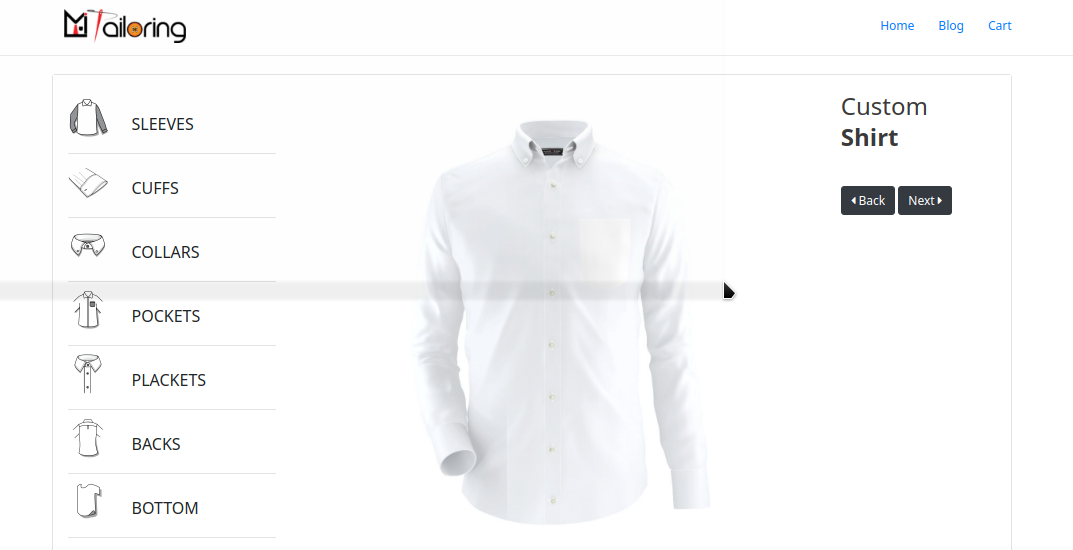
Choose Designs
In this section users will get the actual tailoring plugin interface which attract them easily. As they can easily choose their own design of shirt here. Every option has their sub-option to choose. And all the changes will be visible in real-time there. they can see the transformation or changes right after clicking the item. After choosing their design simple click to the next button from the right sidebar, and they will go for fittings section. If want to select another fabric from previous page, they can also go to the previous section.
-
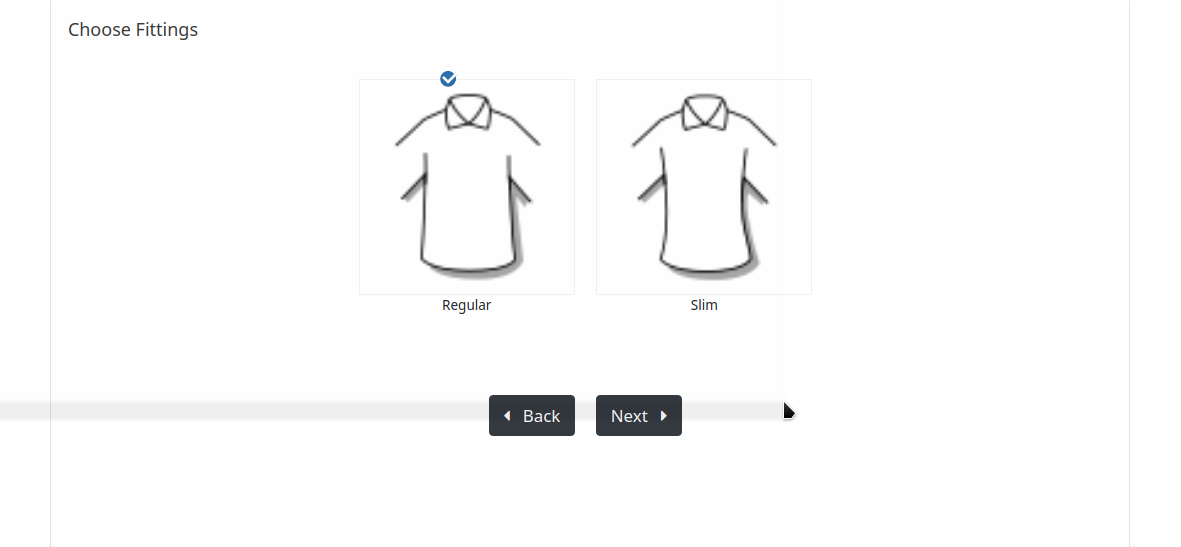
Choose Fittings
Fitting section contains 2 fittings by default, and that can be more if you just add more fittings from the plugin admin panel. Here simply select one fitting and click next and go to the measurement panel. There's another previous button for go back.
-
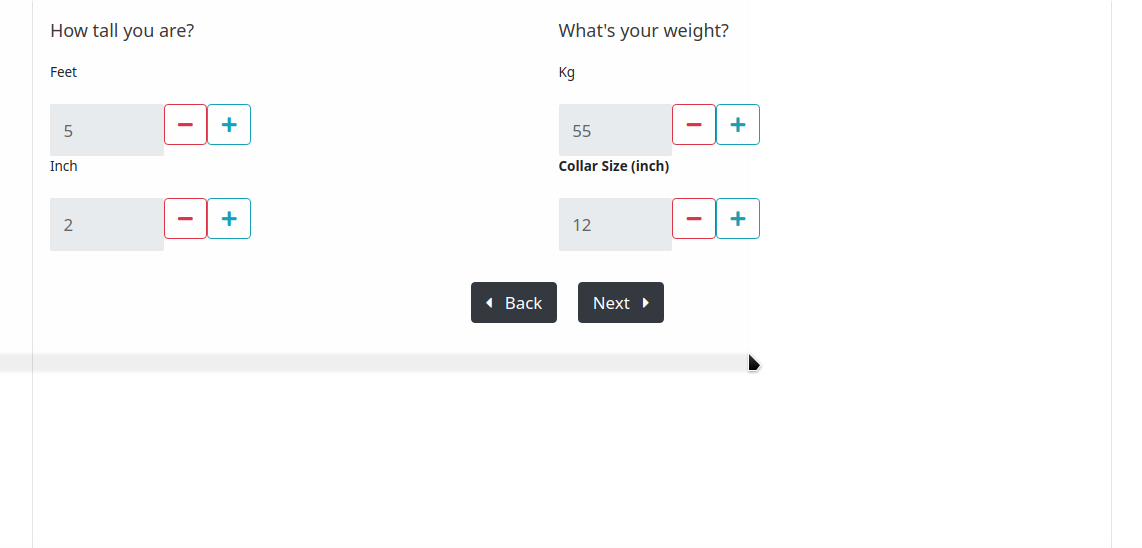
Choose Measurements
Measurements are getting standerd sizes of a person. Feet, Inch, Weight and Collar Size. On this section fields are carrying some default values, which can be changed from the plugin admin panel. Please check Measurement settings. After choosing the measurement just simply click next to go to the review section.
-
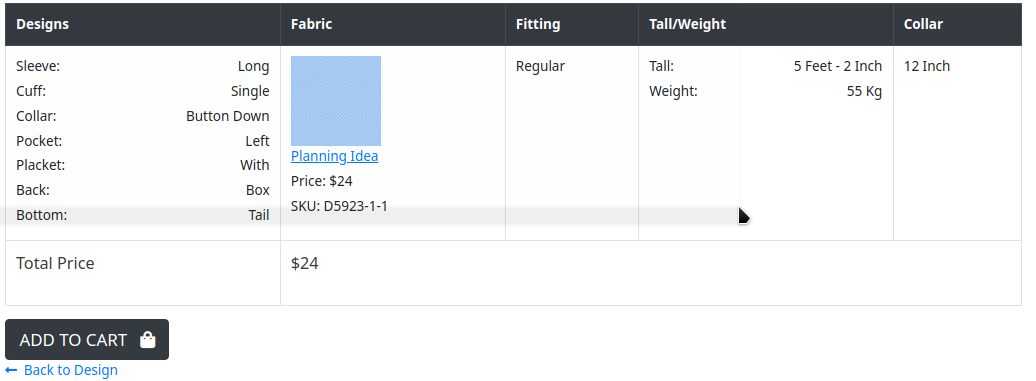
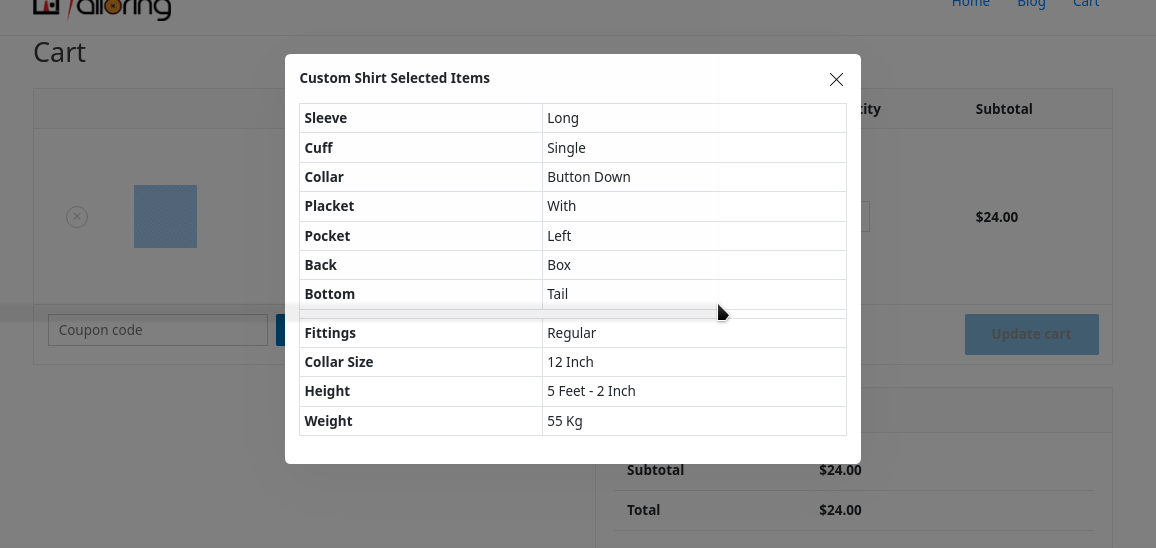
Review Selections
This section will contain all the details of a customer's selections. Which fabric they choosen, Which sizes, collar style, cuffs, sleeves etc. details will be there. Just check them all the click Add to Cart button. Which will added all the details to the WordPress cart and the page will be redirected to the cart page after 3 seconds.

-
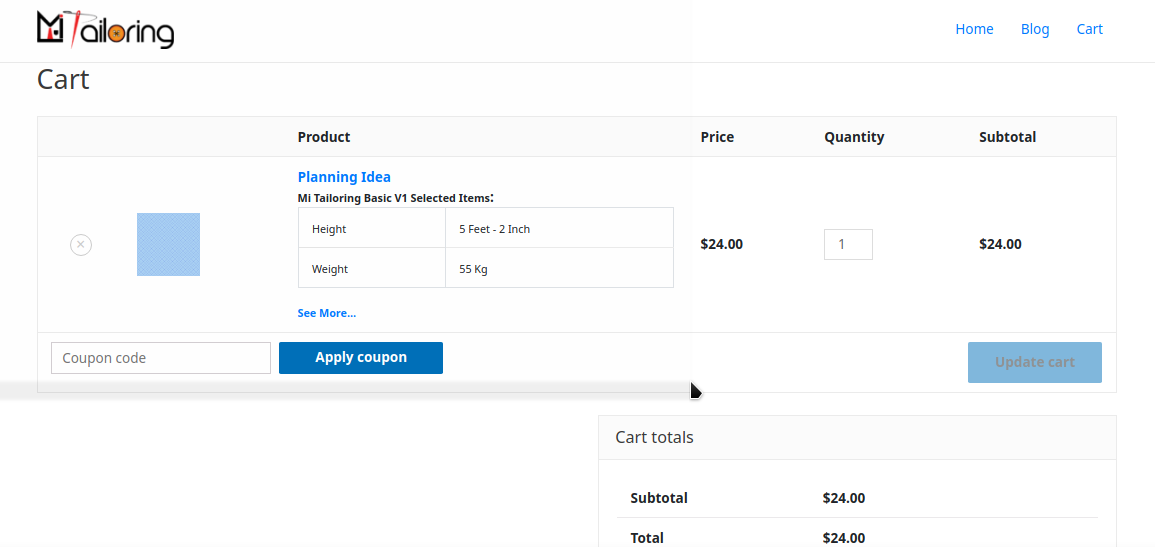
Cart Page
On this cart page all the section will be as like default wordpress cart. The only thing will be shown the selections you made on the plugin. This custom functions are called with only Mi Tailoring Plugin. There customers can get a button called See More... Which will show all the selection list. Now you can go to checkout as well wordpress default option.
-
Checkout Page
This page will be same as wordpress default page. The only it contains the tailoring option is to show the selections of a customer. Now Just simple customer can provide their details and than purchase. -
Order Page
After completing the purchase wordpress will redirect the customer to the order complete page by default. Now on this page there's some details coming from the Mi Tailoring plugin. Which is the selections a customer selected. All the choices they have made are recorded there. So, they can simply check anytime their order details, which is also better for your company to make the perfect shirt design your customer wants.
FAQ
A FAQ is a list of frequently asked questions (FAQs) and answers on a particular topic.
Now just activate the plugin with the credentials sends to the purchase email and Boom! the plugin will be working.
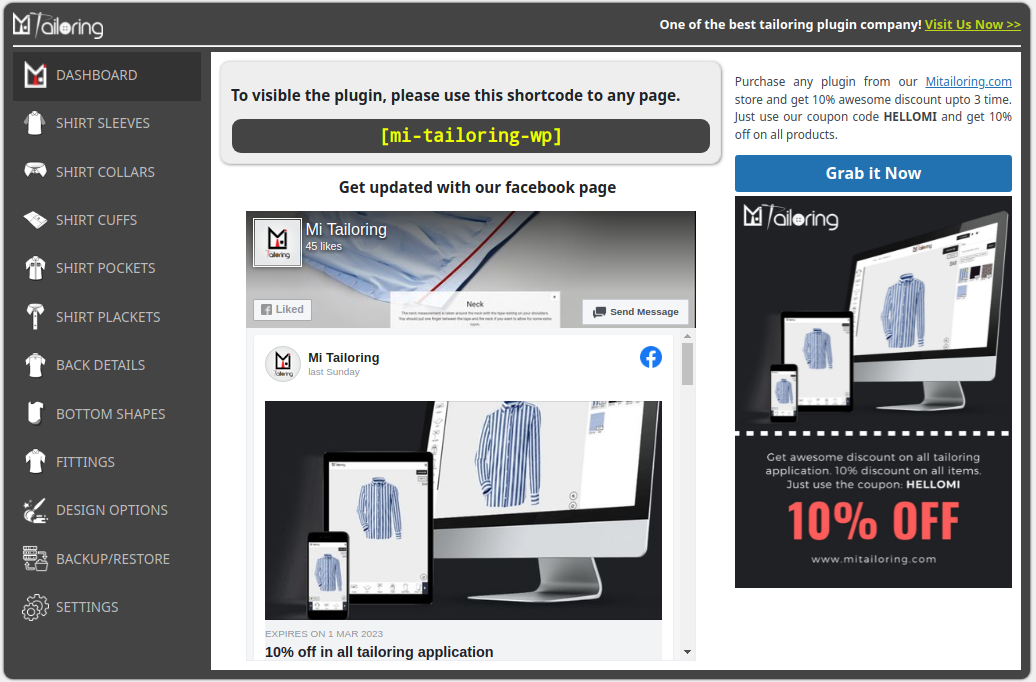
[mi-tailoring-wp]Support
If this documentation doesn't answer your questions, So, Please send us Email via Item Support Page
We are located in GMT +6:00 time zone and we answer all questions within 12-24 hours in weekdays. In some rare cases the waiting time can be to 48 hours. (except holiday seasons which might take longer).
Don’t forget to Rate Mi Tailoring
Changelog
See what's new added, changed, fixed, improved or updated in the latest versions.
For Future Updates Follow Us @mitailoring / @facebook / @twitter / @Linkedin / @Instagram
Version 1.0 (8 April, 2020)
Initial Release